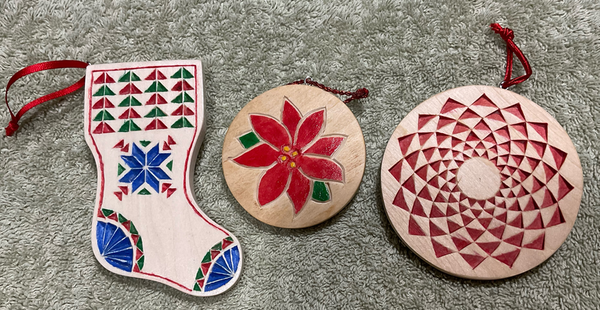
There I was, a fairly new chip-carver proudly showing my beautifully carved star ornament - no chip out in the center point - in it's natural form for all to see. Then my brother says..."That one doesn't look finished."
Ugh!
My brother wasn't the only one to tell me that, so that led me down a path of painting entire ornaments. I've always used acrylic paints on my chip carvings. It's taken me a while, but I've slowly learned it's ok to leave some areas bare. But, if I'm being honest, I do enjoy the painting and coming up with different color combinations. Painting all of my ornaments helped me figure out different techniques, what works well
🤩 and not-so-well 😢.
If you've ever tried painting a carving, you may already be familiar with one potential issue - Color Bleed. It's a sickening feeling to see color bleed to parts where it isn't intended.
To prevent this, I like to spray 2-3 coats of matte acrylic on before painting, preferably 3. The downside is it can take a little more effort to get the
paint coverage you're after - I typically end up doing 2 coats of paint to get solid coverage on the areas I'm painting.
However, a benefit of the spray acrylic coats is that you can easily wipe away any paint from areas you don't want it. When painting a carved area and paint ends up outside of the carved area I'll wait for it to dry (usually just a couple of minutes) and then wrap a wet cloth around my finger and wipe away
the unwanted paint. If I try to wipe the paint away before it's dry, I end up spreading it to other areas and then have to clean those, too.
I'll stop there for this week. On to the emails!
Dave's painted ornaments pop!
Last week I included an email from Dave with questions he had on stains, and also shared his techniques with Briwax and shellac. Well, he also shared pictures of painted ornaments which fits right in with this week's topic!
Notice the balance between painted and natural
surfaces. I especially enjoy the colors that will brighten any Christmas tree!
Fran shares her finishing technique and her own free form carving!
Troy,
Thanks for the finishing tips. And thank you for carrying on the excellent chip carving program and tradition that Marty gave us. The exhibits below from you, Carl and Marty are truly
wonderful.
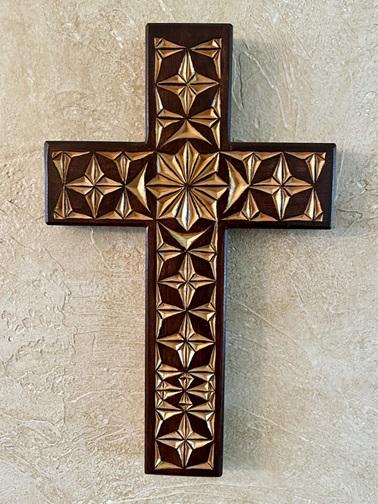
I like to do various colors and stains too. Here's a cross fromMy Chip Carving's stock and design that I completed recently for a friend for Christmas. I'm not a very good chip carver, so using
stains, either oils or acrylics, makes for a stronger end product as gifts for friends and family.
1st use Minwax sand sealer.
*Lightly sanded with 400 grit, then vacuumed and tack clothed it.
*painted in the acrylic gold leaf.
*then "rolled" on an acrylic walnut color very lightly several times with a small, finely napped foam roller to get the desired color depth and consistency...after each coat, I
immediately dry brushed the wider surfaces to give it a wood grain effect.
*I had to touch up some fine lines with the gold leaf when the roller left a bit of 'fuzz'.
(Don't we all have to correct mistakes and blemishes sometimes?)
* Finally sealed it with several matt coats of Deft shellac spray.
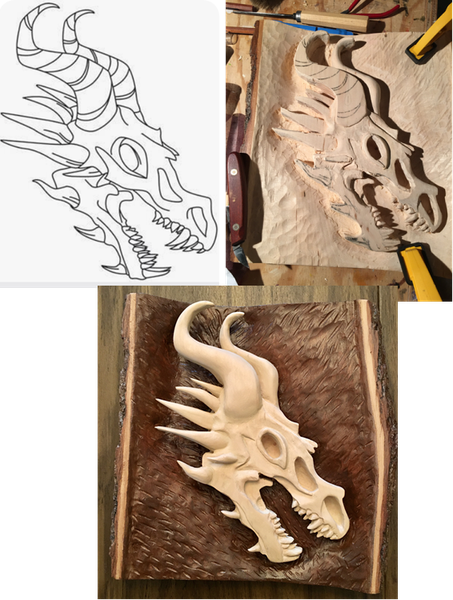
I know free form relief carving is not the focus of "My Chip Carving", but sometimes I like
to carve various images requested from friends and family. My novice chip carving skill comes in handy for parts of these projects. So, my granddaughter asked me to carve a dragon image which is based on a true, historic artifact.
At first, I was puzzled about how to approach it. I started with a 2" thick piece of bass wood; heat transferred image to shape up the base image with a Dremel routing attachment; carved what I could to bring out the basic levels and detail including the lower horns; then I added bass wood pieces to build up the elevated horns. And yes, a few of the teeth had to be separately carved and glued in
since a few of them broke off because of the fragile cross grain in that section. Finally, and "insincerely" I used a bit of wood filler and sanding to smooth out the glued seams, etc., I finished the head with Minwax sand sealer and clear coat before carefully painting the background.
*as some may know, the word 'sincere' comes from the Latin 'sine cera' or without wax.
For a couple of years, I was not a
Platinum member, and now I have to say it's well worth it because I have access to so many features of "My Chip Carving".
Cheers to you and all;
Best regards, Fran
Thank you for sharing, Fran! Your chip carving looks just fine to me! The free form dragon turned out AMAZING! 😍
Want to learn how to chip carve just like Fran? A Platinum membership gives you access to ALL of the Courses to Learn how!
Click below to Sign Up!
What are your latest projects?I'd love to see them! Send them to me at: troy@mychipcarving.com