The last two weeks I've discussed the importance and value of of good carving wood and a sharp knife. This week I'll round it out by discussing wood preparation.
One aspect of wood
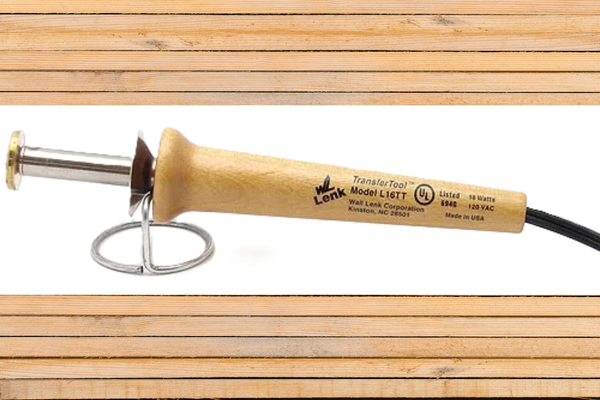
preparation is a smooth surface before applying your pattern. This can easily be accomplished by sanding the wood with 220-grit sandpaper. The smooth surface makes applying a pattern easier, especially if you’re using the Pattern Transfer Tool!
Another factor to be aware of when working with wood is its moisture content. Dealing with the moisture content of wood can be a bit of a complex topic, and I must admit that I am not an expert on it. However, the issue arises from time to time when someone mentions that the wood they are carving is hard or brittle, which can result in chip-out.
If
you’re not looking to become an expert in measuring the moisture content of wood and you find the wood you're carving is too hard or brittle, there are some simple things you can do. You can try spraying it with rubbing alcohol or a 50/50 mix of rubbing alcohol and water. Avoid using only water because it can raise the wood grain.
Alternatively, you can put the board in a plastic bag with a wet paper towel for a day or two, but
make sure they are not touching each other. A warning from another reader, Gary, “One thing I should have added is that you should NEVER let the wood contact standing water from condensation because your next problem will be mold. Basswood sucks water up like a sponge You can kill it with a mild bleach solution, but it will likely stain your lovely creamy white basswood. Again, don't ask me how I know...”
However, if you want
to learn more about wood moisture content which may involve using several tools such as moisture meters and hygrometers, check out some valuable information available in the Community Forums(specifically hereand here). You’ll even find a DIY setup to achieve moisture content within the ideal range of 12-15%.
Do you have any other techniques you use to help soften brittle wood?
Made up entirely of 3 corner chips, it is fun to find the variety of shapes found in the carved and uncarved areas. I finished it with 2 coats of clear matte acrylic spray and then applied a Candlelight gel stain to the entire plate, followed by a Georgian Cherry gel stain on the larger carved areas. The center is 3" in diameter.
Do you want to carve one for yourself, or as a gift??
A Couple of Insights on Moisture Content from Gary
... I am also a firm believer in getting the moisture content up in the wood before starting to carve. For me, it makes all the difference in the world, especially for avoiding chip outs, with the grain cuts, and keeping nice sharp ridges on a pattern with lots of adjacent chips. Getting the moisture into the mid to upper teens really makes a difference. Most wood I get is at or below 5% which makes
sense for the mill to keep warpage down. No one wants to get a bunch of product that won't lay flat, myself included. But, once the pattern is on, it goes into the "humidor" for at least two days or more before I even consider giving it a try. I use a handheld moisture meter to check it in critical places to make sure I am at 14% or more. And, it gets stored there between carving sessions. I have a digital humidity meter to keep track of the
humidity.
While the benefits of adding moisture to the wood before carving can lead to a more positive carving experience, there is a downside. You will typically get some warping of the wood either during or right after the carving is done. This might be off-putting to some. But, most of it can be easily mitigated by adding pressure to the wood to keep it flat as it dries since the wood is somewhat flexible when it is moist. Hence the reason that I
call it a more advanced technique.
This was a game changer for me. Now, my daily late afternoon one hour carving sessions are a happy place that I look forward to. Speaking of which, I am off to finish a tree topper!
Thanks,
Gary
Thanks for sharing your experiences and knowledge on the topic Gary!
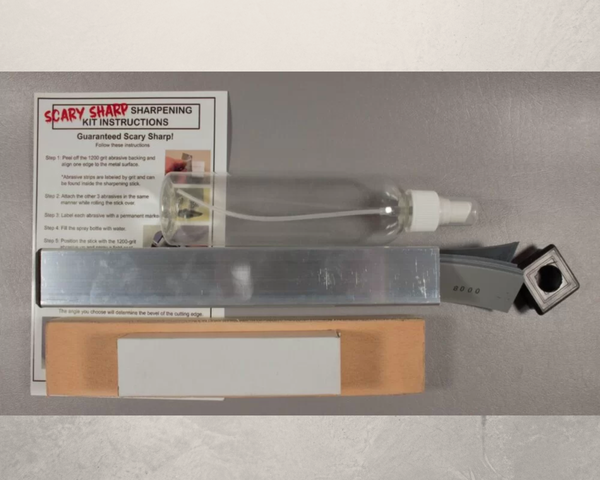
Want to use the Scary Sharp Kit on the go? Jon shares his ideas!
Good morning Troy!
I love my Scary Sharp kit. I made a change to mine that I've enjoyed.
The aluminum tube thickness is perfect for the way I sharpen, keeping my knuckles away from whatever it's resting on. Every other sharpening tool or strop I
have is thinner, and I either have to hold it in my other hand or on the edge of my work surface.
Because I have other sharpening tools that are equal to the 1200 grit strip, I chose to replace that one with a strip of leather, integrating a strop into the four sides. It's my favorite strop!
I also bought a small travel spray bottle for the water I use on the abrasive strips. Both the small spray bottle and the white
gold compound fit inside the tube. This has made it simpler for travel, and easier to keep everything right at hand.
Thanks for keeping the torch lit! Keep up the great work.
Best,
Jon
Transfer patterns with ease with the Pattern Transfer Tool!