Take a look at this year's Christmas Ornament Pattern! 👀
Howdy !
Is it ever too early to start thinking about Christmas? I know it’s only August, but this month’s project is something I look forward to every year—the new Christmas ornament! I made sure to include the year on this one, so it’ll be a keepsake for years to come. While I've typically painted my ornaments, this year I decided to try using
colored pencils. After writing about using colored pencils for adding color to your chip carvings in a previous newsletter, I decided to put that advice to the test on this year’s ornament. I’ll admit, I may have gotten a bit carried away with the coloring, but experimenting with different combinations turned out to be a lot of fun. The process was enjoyable, and the results were well worth it!
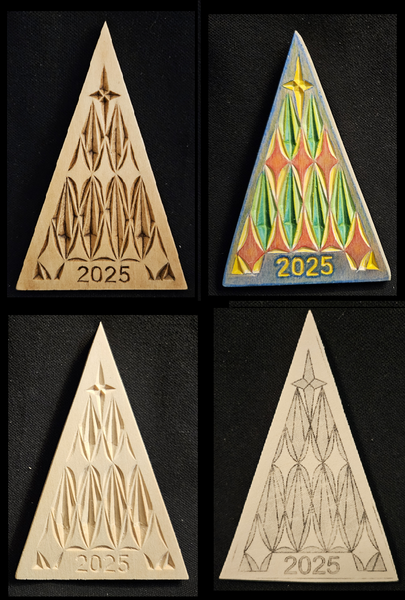
The picture above has examples of this year’s ornament finished in three different ways: colored pencil, natural, and stained. It’s a great opportunity to try something new or stick to your favorite approach. Personally, I found using colored pencils to be an enjoyable way to bring extra life to the carving, but the natural and stained finishes each have their own charm too. You can see all three finishes side
by side, and decide which one appeals to you—or try them all!
Tips for Coloring Your Carvings
Start light: Build up color gradually with gentle layers. It’s easier to add color than to remove it!
Blend colors: Try blending two or more shades for a unique look and extra depth.
Seal your work: After coloring, use a clear sealer to protect your ornament and keep colors
vibrant.
I’d love to hear which finishing technique you prefer, or if you have your own twist on ornament finishing. Send your photos and thoughts to troy@mychipcarving.com—it’s always a treat to see your creativity in action.
This year's pattern is a combination of straight and curved cuts. The curved cuts help create the diamond shapes. A horizontal hole is drilled in the sides at the peak for a ribbon to pass through.
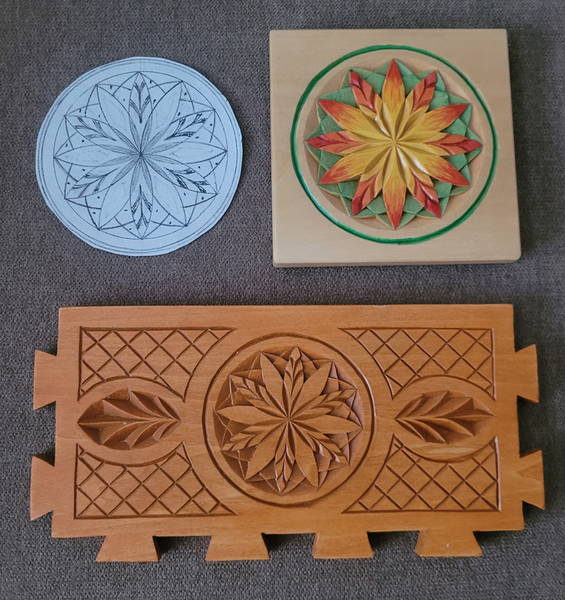
July's project with Old World Style chips reminded me of the fun I had creating and carving a floral rosette that I used on a napkin holder and a set of coasters.
It's a bit of a challenge to carve the OWS leaf chips, but well worth the practice and effort in the end.
I've attached a photo of the paper pattern I created,
with parts of the two projects I used it on. I've also attached a new, cleaner CAD pattern that you're welcome to use or share with anyone interested in it.
I've been so blessed by and grateful for the generous and helpful MCC community, and the resources and mentoring available through MCC.
Thank you Marty and Troy, and to all who have shared your talents and stories with us!
Hello Jon,
Nice work! I love the colors you used on the coaster, and the stained napkin holder is beautiful, too, with an even stain throughout.
Anyone who is interested in Jon's pattern, please send me an email at: troy@mychipcarving.com
Platinum membership gives you access to ALLof the Courses,Patterns, and Video archives!
Click below to Sign Up!
Have a great week, !
Deep in thought...or waiting to be given attention! Mia keeps me guessing. 😄