I received some great responses to the past two newsletters on various ways to add color, and I thought I’d take this week to share some of them with you. You’ll find that one involves a lot more than ‘just adding color”, but is something that can be enjoyed and appreciated. So let’s get right to it!
Hi Troy,
I have been experimenting with adding color over the past
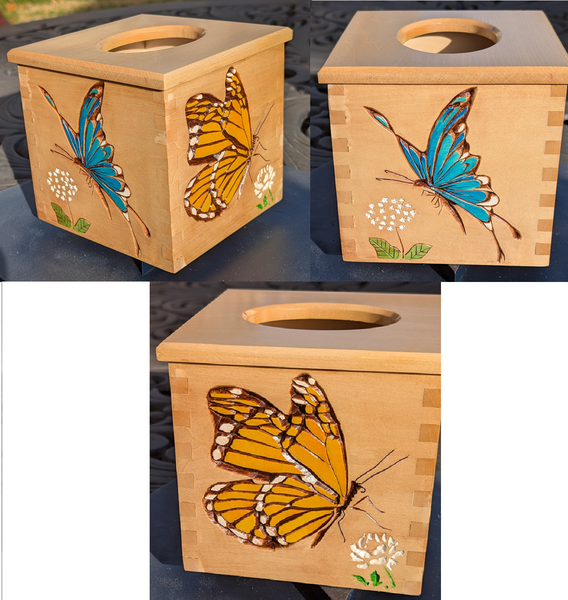
couple of years. Sometimes I do it as you described. But, often I want a little different effect. So, I use watercolors. Just a cheap set I bought at Walmart in the children's school supplies area. The process I use isn't necessarily for the faint of heart, but I get the effect I want. I carefully apply the watercolors directly on fresh wood before any sealant is applied. The watercolors seem to give me more control over the shade and intensity of the color. I started this when I was doing
a fair number of butterflies. Once I am happy with the color I apply at least 2 coats of spray lacquer. I want the entire surface impervious to the gel stain I add as the next step. I don't want any stain sticking to my colored areas. This is a bit of a fussy process. It takes a bit of patience and a light touch with just a tiny bit of mineral spirits on a finely woven, lint free cloth.
The effect I get from this allows some of the character of the wood to
come through and gives it an almost transparent look. I can also vary the intensity of the color if I want it to have a more organic look. I will admit that carving "organic" patterns and coloring them is not as personally satisfying as doing complex geometric patterns with lots of intersecting adjacent chips, but it seems to make others happy and that is a reward in and of itself.
Here are some pictures of my "almost finished" tissue box I am making for
my daughter-in-law that used the process I described.
Thanks for all you do,
Gary
Thanks for your email and for sharing your process! I haven't used watercolors, but I have some watercolor pencils to try out. 🙂 I asked Gary if he has had any issues with the water raising the wood grain when applying the watercolors, and he said he hasn't, but he also doesn't use too much water. I think the butterflies are beautiful! I definitely see the variations in shade and intensity of the
colors and understand why others enjoy seeing your work. While finishing a nice, intricate, symmetrical chip carving design is rewarding, I have also found that I enjoy the painting process just as much at times. But you're right, it's not always for the faint of heart.
Hi Troy,
I've been enjoying your newsletters, and I love Patti's Dala horse plate!
Thanks for sharing your techniques on
coloring. The best I've ever seen is done by the artist, Jo Sonja. The way she highlights and brings out the details in chip carved pieces is amazing. Here's a couple of her pieces. I believe the first was carved by Tim Monzka (Wayne Barton pattern), and the second was one of mine.
-Raquel G
Adam & Eve
Snow Queen
I've never seen anything like that for coloring - it is very impressive! The chip carving on both plates is equally impressive. I love the border pattern on Raquel's plate -it looks like it would be a fun and challenging pattern to carve. I've also bookmarked Jo Sonja's website for future browsing and reading enjoyment. Thank you for sharing this, it is beautiful work!
Jo Sonja is an accomplished Folk Artist whose website is worth a look if you enjoyed the paintings on the two plates above. However, most of the artwork on the website does not involve any chip carving, so enjoy and appreciate the paintings if you do visit.
And if you have a favorite tip, I’d love to hear about it—just reply to
this email or send your ideas to troy@mychipcarving.com!
November's Monthly Project
Napkin Holder: Free-Form Flowers
I thought it was time for another free-form pattern and decided on this flower pattern. It's a nice combination of a few larger chips and other thinner, flowing chips. Leave it natural, or add some color!
Order a Napkin Holder with or without a Pattern applied.
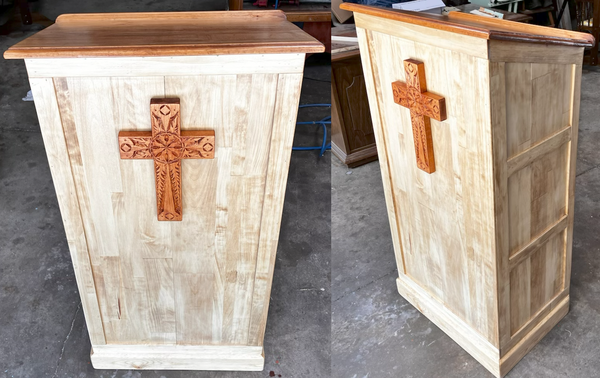
I thought I'd send you a couple of pictures of the cross I was working on. While I am very much a green horn when it comes to chip carving, I'm pretty happy with how it turned out in the end. It's not perfect by far, but it
works.
Our son had a divine call to teach theology at our Lutheran High School. The podium that was in the room was too short for our tall son. So he asked my husband to make him a new podium. I made the cross for the front because that was on the picture our son sent, so my husband would know what exactly to make. When our son saw the podium the first thing he asked was "who made the cross"? So that made me feel really good. Also it looks great in his new
classroom!
Thank you for your time,
Robin
What a wonderful podium! Your cross looks great and is the perfect size! I'm sure he loves standing behind it every day in the classroom. I'd say you did a fine job on the cross based on the pictures. Thanks for sharing!
! ! ! GIFT CARD SALE! ! !
For every $50 gift card, get a $5 card FREE!
For every $100 gift card, get a $15 card FREE!
For every $200 gift card, get a $40 card FREE!
For every $300 gift card, get a $75 card
FREE!
⭐ To receive your FREE Gift, type GIFT CARD SALE in the Comment section during checkout!
⭐ Your FREE card will be emailed to you.
Perfect for those who want to give you a gift. And for those you want to gift.
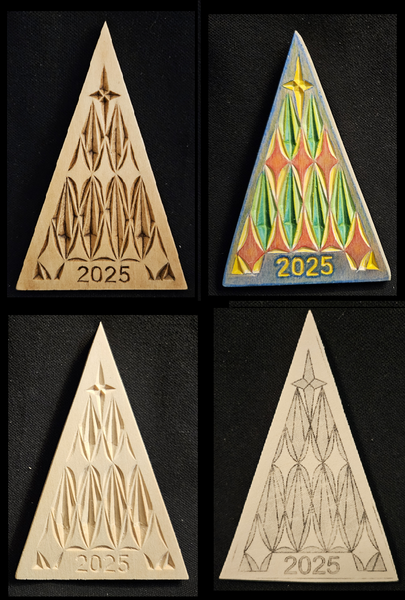
This year's pattern is a combination of straight and curved cuts. The curved cuts help create the diamond shapes. A horizontal hole is drilled in the sides at the peak for a ribbon to pass through.


 Thanks for sharing!